Manage customer accounts
This guide describes how to use the Nautical GraphQL API to register a new account as a customer and do common account management operations.
Creating a new customer account
There are two mutations you can use to create a customer. One is the accountRegister mutation, and the other is the customerCreate mutation. It's only with the latter mutation, customerCreate, where you could also set the new use/customer to be an “affiliate.” We'll start with the more simple, accountRegister mutation, and then move on to customerCreate and customerUpdate.
Much of the following relies on emails being sent to the user/customer to activate their account and/or set/reset their password. In order for these emails to actually get sent out, your Sendgrid app must be activated.
Previous orders
When an account is activated, existing anonymous orders using the same email address are automatically assigned to the new account.
Registration without email confirmation
To create a new customer account, use the accountRegister mutation. The mutation takes the following input fields:
email: user's email address.password: user's password.
mutation {
  accountRegister(
    input: { email: "customer@example.com", password: "secret" }
  ) {
    accountErrors {
      field
      code
    }
    user {
      email
      isActive
    }
  }
}
As a result, we get data of the newly created user:
{
  "data": {
    "accountRegister": {
      "accountErrors": [],
      "user": {
        "email": "customer@example.com",
        "isActive": true
      }
    }
  }
}
The isActive flag informs that the account is active and the user can sign in to their account.
Examples above include accountErrors field, which may return any data-level errors. Here is a response that would be returned if there is already account registered for the given email:
{
  "data": {
    "accountRegister": {
      "accountErrors": [
        {
          "field": "email",
          "code": "UNIQUE"
        }
      ],
      "user": null
    }
  }
}
Registration with email confirmation
Registering an account with email confirmation consists of two steps and it requires you to have a storefront view, where users will be redirected to confirm their email. First, you need to use the accountRegister mutation, which will create an inactive account and send an email with the confirmation link.
The mutation takes the following input fields:
email: user's email address.password: user's password.redirectUrl: path to a view where the user should be redirected to confirm their email
The redirectUrl is required because, assuming you have your Sendgrid app activated, an email will get sent to the user with this redirect url. This redirect url is needed to confirm the account and have it set to active (so they could then log in, order products, etc…). The redirect url should be <root url of your storefront>/account-confirm/.
This example assumes that you're running the storefront locally with the default settings (running on port 3000):
mutation {
  accountRegister(
    input: {
      email: "customer@example.com"
      password: "secret"
      redirectUrl: "http://localhost:3000/account-confirm/"
    }
  ) {
    accountErrors {
      field
      code
    }
    user {
      email
      isActive
    }
  }
}
As a result, we get data of the newly created, but yet inactive user:
{
  "data": {
    "accountRegister": {
      "accountErrors": [],
      "user": {
        "email": "customer@example.com",
        "isActive": false
      }
    }
  }
}
At the same time the user customer@example.com should receive an email with a confirmation link based on provided redirectUrl path, for example:
http://localhost:3000/account-confirm/?email=customer%40example.com&token=5fc-9f2116f96bdafd612cf4
The user will be able to activate their account by clicking on the link in the email and sign in to the storefront thereafter. The link in the email will consist of the redirect url provided above combined with a one-time-use token that's created for the user upon this mutation being triggered.
The link contains two query parameters—email and token—which are required to proceed with the second mutation, confirmAccount:
mutation {
  confirmAccount(
    email: "customer@example.com"
    token: "5fc-9f2116f96bdafd612cf4"
  ) {
    accountErrors {
      field
      code
    }
    user {
      email
      isActive
    }
  }
}
If the token is valid, the user will be successfully activated:
{
  "data": {
    "confirmAccount": {
      "accountErrors": [],
      "user": {
        "email": "customer@example.com",
        "isActive": true
      }
    }
  }
}
Use the customerCreate mutation (alternative method)
To create a customer with customerCreate, you'll need the customer's:
- Email address
But you should also get/use, just to name a few items:
- First name
- Last name
- Affiliate status (are they an affiliate or just a regular customer?)
- Active status (if not set as active, they won't be able to do things such as sign in to the storefront, etc…)
- Company name
- Shipping address
- Billing address
(There are other items you can populate as well. You can see them all if you look at the Docs for the customerCreate mutation in your graphQL playground.)
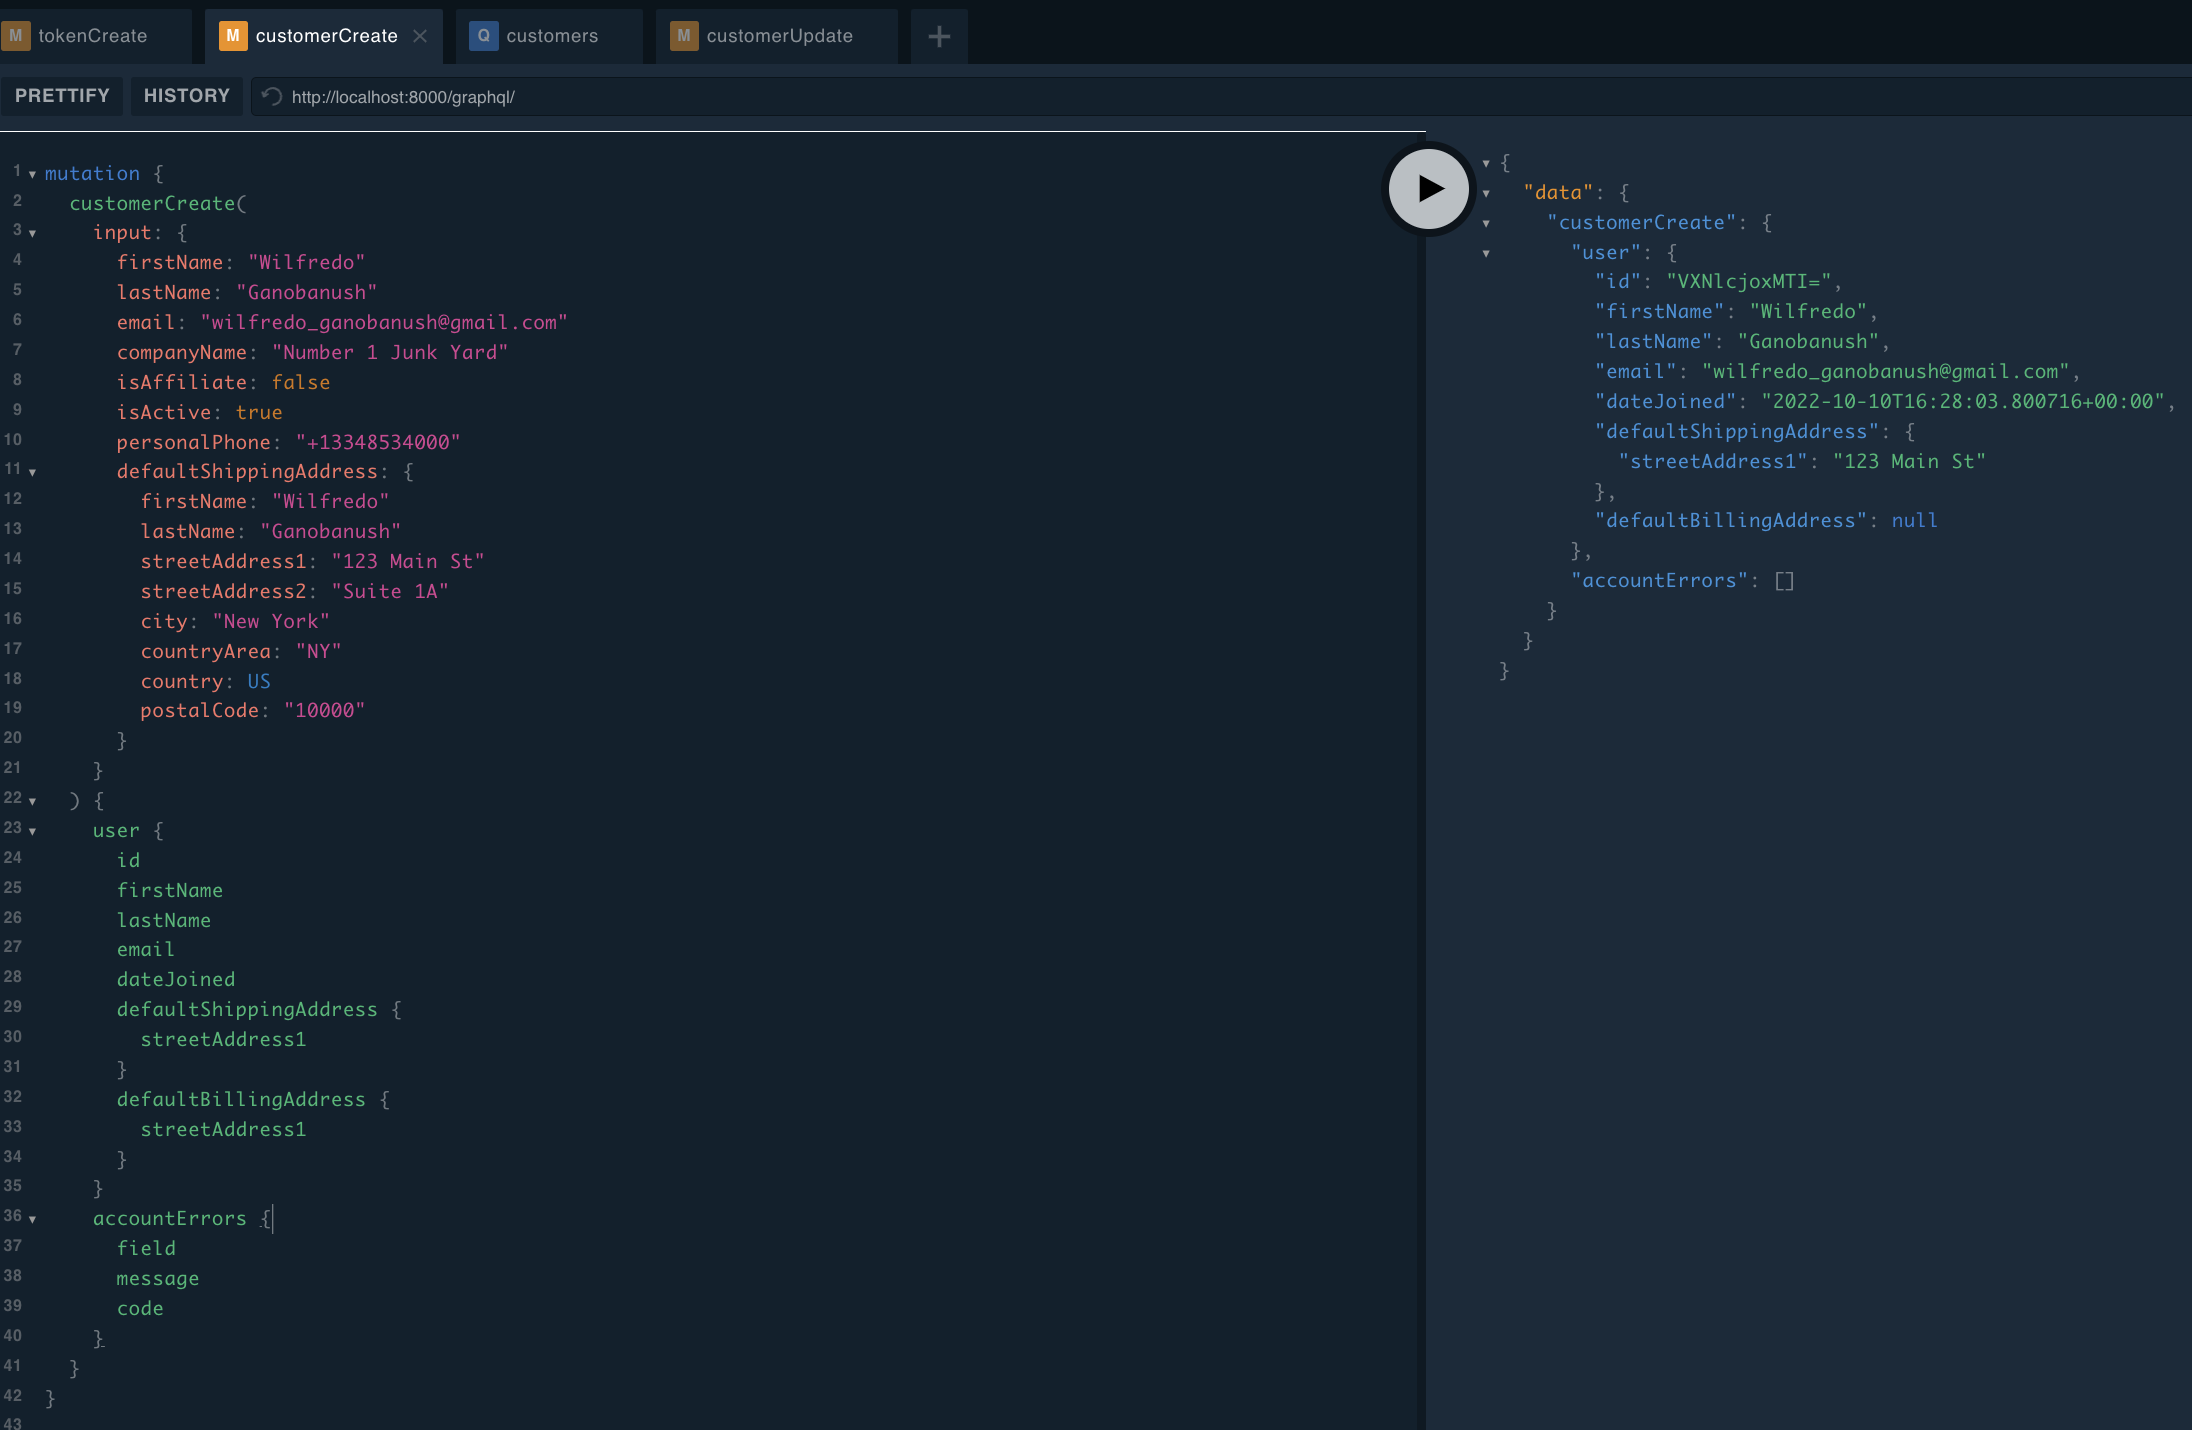
If you don't have the above or wish to add it and other info later, you can always update the given customer with additional information after creating them, which will be shown in the Update a Customer/Affiliate section, below. The customerCreate mutation should look something like this:
mutation {
  customerCreate(
    input: {
      firstName: "Wilfredo"
      lastName: "Ganobanush"
      email: "wilfredo_ganobanush@gmail.com"
      companyName: "Number 1 Junk Yard"
      isAffiliate: false
      isActive: true
      personalPhone: "+13348534000"
      defaultShippingAddress: {
        firstName: "Wilfredo"
        lastName: "Ganobanush"
        streetAddress1: "123 Main St"
        streetAddress2: "Suite 1A"
        city: "New York"
        countryArea: "NY"
        country: US
        postalCode: "10000"
      }
    }
  ) {
    user {
      id
      firstName
      lastName
      email
      dateJoined
      defaultShippingAddress {
        streetAddress1
      }
      defaultBillingAddress {
        streetAddress1
      }
    }
    accountErrors {
      field
      message
      code
    }
  }
}
Update a Customer
Let's say we want to make the following updates to an existing customer:
- Update the customer with a billing address
- Add a note about the customer
- Change the phone number
We'll, of course, need the above info to update the customer with. But we'll also need the ID of the customer, which we have above from the customerCreate mutation and in our case is "VXNlcjoxMTI=".
Customers Query
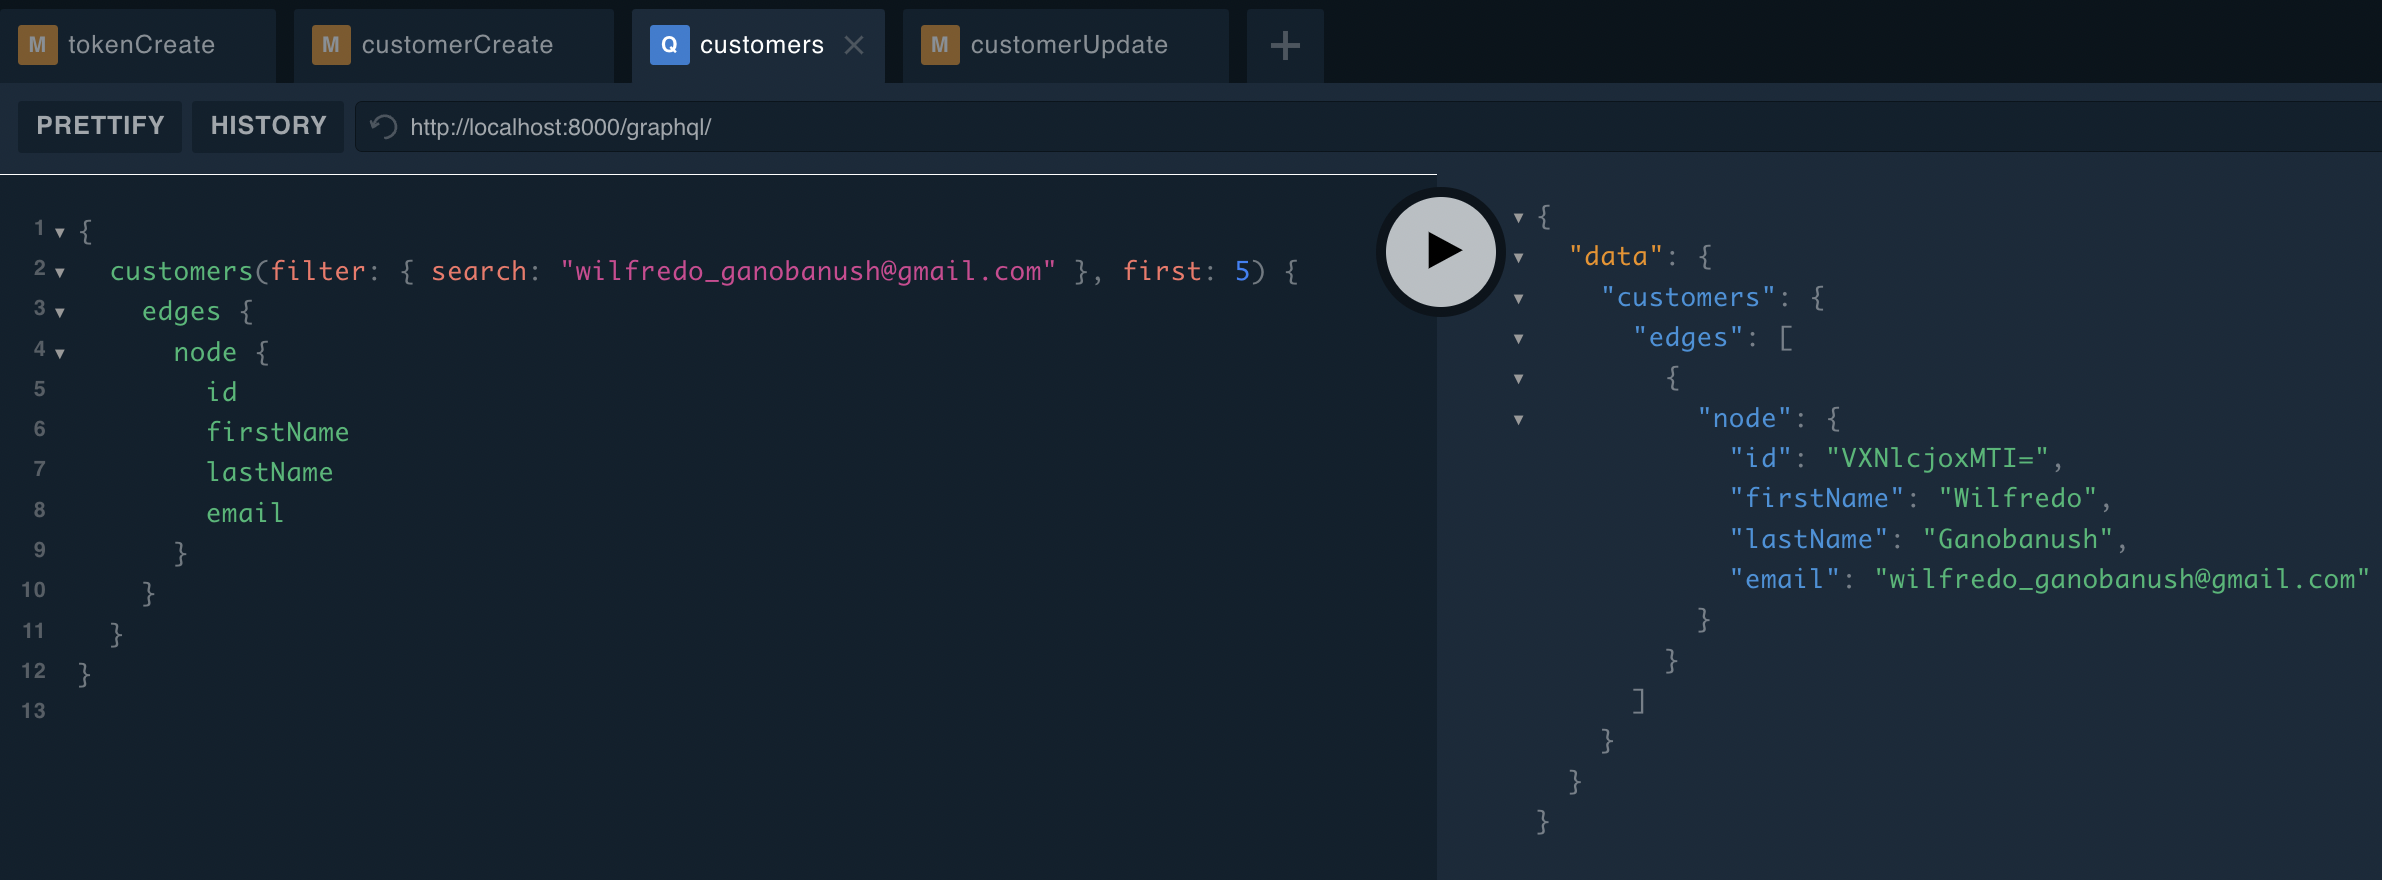
You could also run the customers query if you are doing this much later and don't have the ID readily available. You could search for the given customer a number of ways (see the graphQL docs). In our case, we'll search by their email address.
{
  customers(filter: { search: "wilfredo_ganobanush@gmail.com" }, first: 5) {
    edges {
      node {
        id
        firstName
        lastName
        email
      }
    }
  }
}
Customer Update Mutation
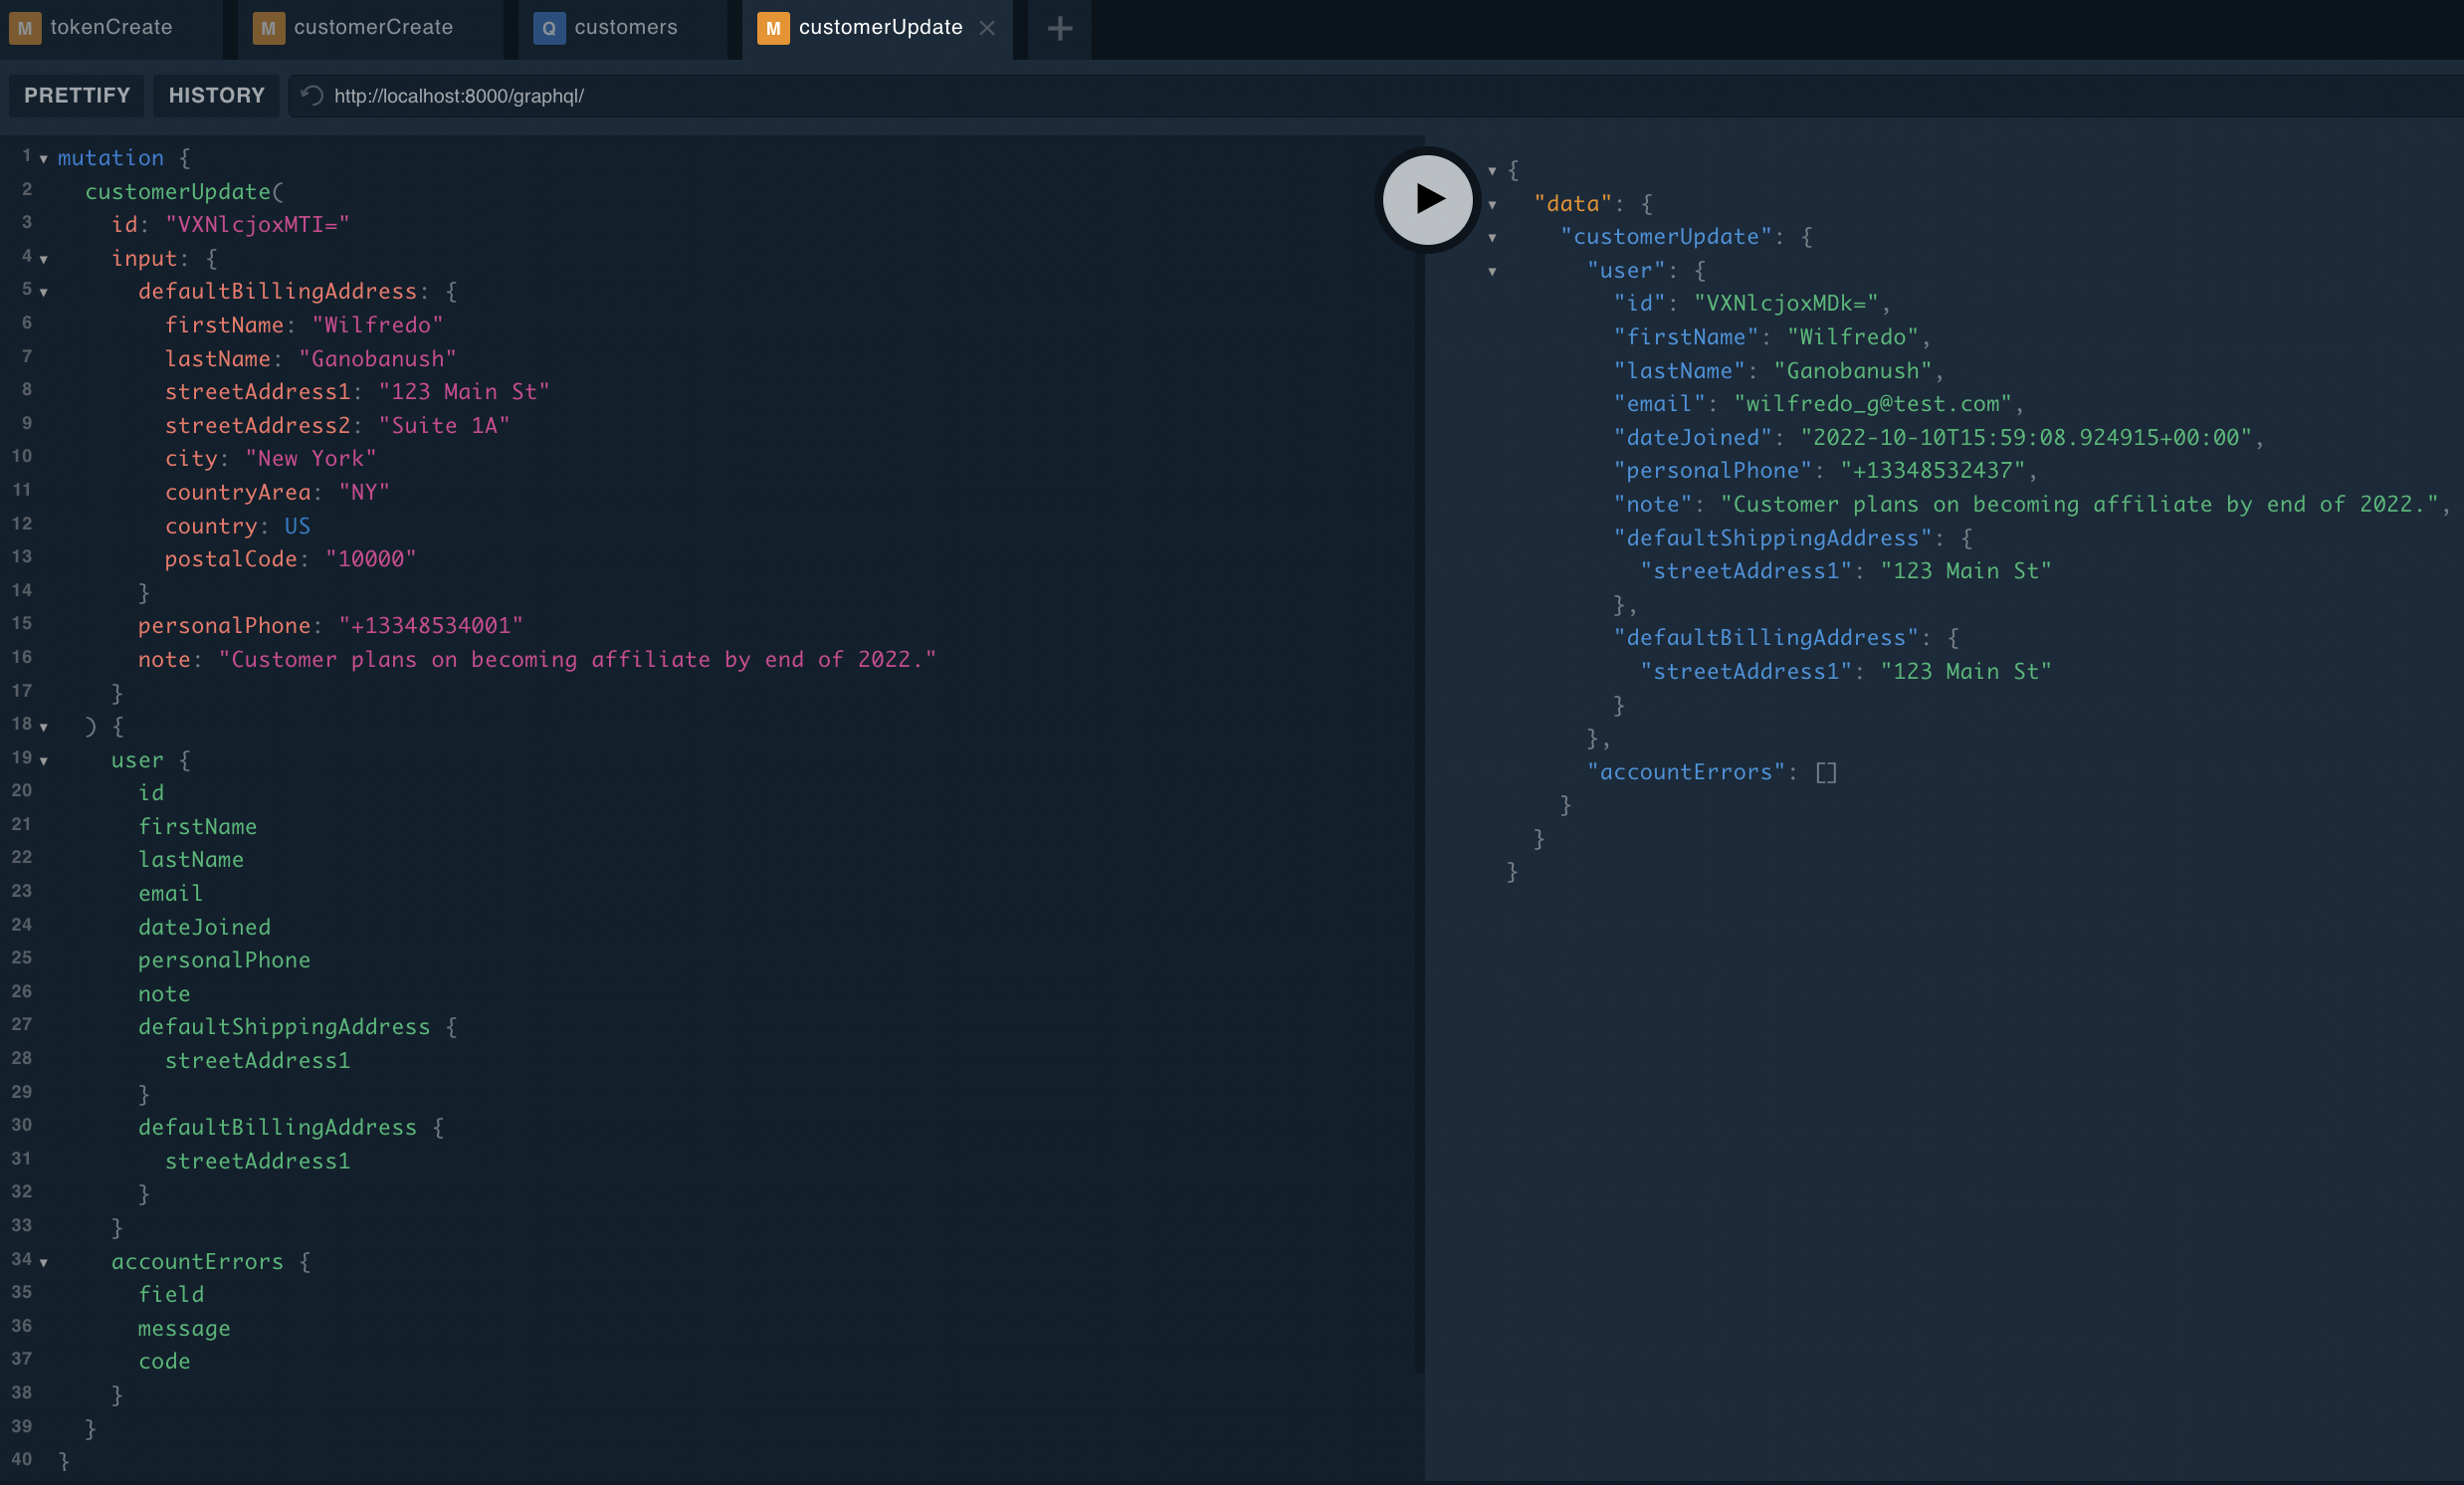
Now that we have all the info we need, we can update the customer, as so:
mutation {
  customerUpdate(
    id: "VXNlcjoxMTI="
    input: {
      defaultBillingAddress: {
        firstName: "Wilfredo"
        lastName: "Ganobanush"
        streetAddress1: "123 Main St"
        streetAddress2: "Suite 1A"
        city: "New York"
        countryArea: "NY"
        country: US
        postalCode: "10000"
      }
      personalPhone: "+13348534001"
      note: "Customer plans on becoming affiliate by end of 2022."
    }
  ) {
    user {
      id
      firstName
      lastName
      email
      dateJoined
      personalPhone
      note
      defaultShippingAddress {
        streetAddress1
      }
      defaultBillingAddress {
        streetAddress1
      }
    }
    accountErrors {
      field
      message
      code
    }
  }
Authentication
The Nautical API uses a JSON Web Token authentication mechanism.
To avoid sending passwords with each request, you need to first create an access token, and then include it as a header with every GraphQL request.
The authorization header has the following format:
Authorization: JWT <your-access-token>
Architecture
There are several types of JWT tokens used in the authentication process:
-
Access tokens are short-lived tokens that allow clients to authenticate as a particular user, and to conduct privileged operations. They should not be persisted as leaking an access token is like giving someone else access to your account.
-
Refresh tokens are long-lived tokens that allow you to generate additional access tokens without requiring the user to provide their email and password every time an access token expires. They should be stored in a way that makes them inaccessible to potential attackers. For web clients, the safest way to store them is an HTTP-only secure cookie. For native clients, use the platform's secure keyring where available.
-
CSRF tokens are used to protect against cross-site resource forgery attacks when the refresh token is stored in a cookie. If you use cookies to store the refresh token, persist the CSRF token in another way, for example using the browser's local storage.
Creating a JWT access token
To create a new JWT token for a user, use the tokenCreate mutation, and provide the user's credentials as the mutation input (email and password).
The mutation also generates a refresh token and returns it as a secure, HTTP-only cookie, and as a field (refreshToken) in the response. The refresh token can be used to generate new access token without the need to store the user's password, see refreshing token. As cookies can be subject to cross-site request forgery attacks, a CSRF token is also generated that needs to be stored and presented when refreshing an access token.
mutation {
  tokenCreate(email: "admin@example.com", password: "admin") {
    token
    refreshToken
    csrfToken
    user {
      email
    }
    errors {
      field
      message
    }
  }
}
A successful response would look like:
{
  "data": {
    "tokenCreate": {
      "token": "eyJ0eXAiOiJKV1QiLCJhbGciOiJIUzI1NiJ9.eyJlbWFpbCI6ImFkbWluQGV4YW1wbGUuY29tIiwiZXhwIjoxNTY2OTEzODc1LCJvcmlnSWF0IjoxNTY2OTEzNTc1fQ.Dw0ccxdxEXsSpM61_Zr_uCyZd-88cNZqM62k_nAjFAE",
      "refreshToken": "eyJ0eXAiOiJKV1QiLCJhbGciOiJIUzI1NiJ9.eyJleHAiOjE1OTM5MzQyMTYsImlhdCI6MTU5MTM0MjIxNiwiZW1haWwiOiJhZG1pbkBleGFtcGxlLmNvbSIsInR5cGUiOiJyZWZyZXNoIiwidXNlcl9pZCI6IlZYTmxjam95TVE9PSIsImlzX3N0YWZmIjp0cnVlLCJpc19zdXBlcnVzZXIiOnRydWV9.CD7JEHc9Og-KFURu6MCR3VnaxISjZfJkqRhx8Y552pU",
      "csrfToken": "7Jzm6rCF2r3CGPYtZls1n5Uh2Lb6sA7IlNtsWej0g7ILCHLOy2nPQzz7awDDnUZW",
      "user": {
        "email": "admin@example.com"
      },
      "errors": []
    }
  }
}
To use the token and authorize subsequent requests, you need to include it as a HTTP Authorization request header:
Authorization: JWT eyJ0eXAiOiJKV1QiLCJhbGciOiJIUzI1NiJ9.eyJlbWFpbCI6ImFkbWluQGV4YW1wbGUuY29tIiwiZXhwIjoxNTY2OTEzODc1LCJvcmlnSWF0IjoxNTY2OTEzNTc1fQ.Dw0ccxdxEXsSpM61_Zr_uCyZd-88cNZqM62k_nAjFAE
Using JWT tokens in Playground
If you are using Playground to browse the API, you can authorize your requests by providing the JWT token in the HTTP HEADERS tab. To do that, paste the following JSON structure into the tab, replacing the token with your real token:
{
  "Authorization": "JWT <your-access-token>"
}
Using JWT tokens with cURL
To authenticate requests sent with cURL, use the -H or --header parameter to pass the JWT token:
curl \
  -H "Authorization: JWT <your-token>" \
  -H "Content-Type: application/json" \
  -X POST \
  -d '{"query": "{ me { email } }"}' \
  http://localhost:8000/graphql/
Verifying a token
To verify the token, use the following mutation:
mutation {
  tokenVerify(token: "<your-access-token>") {
    isValid
    accountErrors {
      field
      code
    }
  }
}
You can verify both access tokens and refresh tokens.
A successful response:
{
  "data": {
    "tokenVerify": {
      "isValid": true,
      "accountErrors": []
    }
  }
}
Refreshing an access token
The tokenRefresh mutation will generate a new access token when provided with a valid refresh token.
If the refresh token is not provided as an argument, the code will try to read it from a cookie set by the tokenCreate mutation. In that case, matching CSRF token is required.
Refreshing with refresh token as a browser cookie
The mutation takes the following input fields:
csrfToken: the CSRF token used to protect against cross-site resource forgery attacks.
mutation {
  tokenRefresh(csrfToken: "<your-csrf-token>") {
    token
    accountErrors {
      code
    }
  }
}
A successful response:
{
  "data": {
    "tokenRefresh": {
      "token": "new-token",
      "accountErrors": []
    }
  }
}
Refreshing with refresh token as an input
The mutation takes the following input fields:
refreshToken: the refresh token returned from thetokenCreatemutation.
mutation {
  tokenRefresh(refreshToken: "<your-refresh-token>") {
    token
    accountErrors {
      code
    }
  }
}
A successful response:
{
  "data": {
    "tokenRefresh": {
      "token": "new-token",
      "accountErrors": []
    }
  }
}
Deactivating all tokens of a particular user
The tokensDeactivateAll mutation will invalidate all tokens (access and refresh, including the token used to invoke the mutation) that belong to the current user.
mutation {
  tokensDeactivateAll {
    accountErrors {
      field
      message
      code
    }
  }
}
Resetting the password
Resetting the password is a two-step operation. First, you need to call a mutation to send an email with a unique link to reset the password.
As you might have noticed already, in the accountRegister mutation above, you put the customer's password in directly into the mutation input. However, in the customerCreate or customerUpdate mutations above, the user has no password set yet.
Whether you want to have the user created through accountRegister reset their password, or the one created/updated through customerCreate/customerUpdate to set theirs, you can use the requestPasswordReset mutation. All you will need is the user's email and the redirectUrl.
The mutation takes the following input fields:
email: user's email address.redirectUrl: path to a view where the user should be redirected to reset the password.
mutation {
  requestPasswordReset(
    email: "customer@example.com"
    redirectUrl: "http://localhost:3000/reset-password/"
  ) {
    accountErrors {
      field
      code
    }
  }
}
As a result, if there are no errors in the response, the system sends an email to customer@example.com with a link to provide a new password, for example:
http://localhost:3000/reset-password/?email=customer%40example.com&token=5fc-9f2116f96bdafd612cf4
The link contains two query parameters—email and token—which are required to proceed with the second mutation, setPassword.
The mutation takes the following input fields:
token: a unique token that was included in the link in the email.email: user's email address.password: the new password.
mutation {
  setPassword(
    token: "5fc-9f2116f96bdafd612cf4"
    email: "customer@example.com"
    password: "new-secret"
  ) {
    accountErrors {
      field
      code
    }
  }
}
If there are no errors in the response, the password is successfully changed.
Changing the password
If you wish to change your password as an authenticated customer, use the passwordChange mutation. The mutation takes the following input fields:
oldPassword: the current user's password.newPassword: the new password.
mutation {
  passwordChange(oldPassword: "secret", newPassword: "new-secret") {
    accountErrors {
      field
      code
    }
  }
}
If no errors were returned, the password was changed successfully.
This mutation requires an authorization header with a valid JWT token.
Changing the email address
Changing an email address of existing user accounts is a two-step operation. First, you need to call the requestEmailChange mutation.
The mutation takes the following input fields:
newEmail: the new email address to set for the account.password: the current user's password.redirectUrl: path to a view where the user should be redirected to confirm the new email address.
mutation {
  requestEmailChange(
    newEmail: "new-address@example.com"
    password: "secret"
    redirectUrl: "http://localhost:3000/confirm-email/"
  ) {
    accountErrors {
      field
      code
    }
    user {
      email
    }
  }
}
If there are no errors, the mutation sends an email to the newEmail address with a link to confirm the operation. In this example, we also return the email of the current user. As you can see in the response below, the email isn't yet updated.
{
  "data": {
    "requestEmailChange": {
      "accountErrors": [],
      "user": {
        "email": "admin@example.com"
      }
    }
  }
}
The confirmation links an additional query-string parameter token which is required to confirm the operation, e.g.:
http://localhost:3000/confirm-email/?token=eyJ0eXAiOiJKV1QiLCJhbGciOiJIUzI1NiJ9.eyJleHAiOjE1ODYxNzY5OTQsIm9sZF9lbWFpbCI6ImFkbWluQGV4YW1wbGUuY29tIiwibmV3X2VtYWlsIjoibmV3LWFkZHJlc3NAZXhhbXBsZS5jb20iLCJ1c2VyX3BrIjoyMX0.aGAo28Ss_zOn_TwAzLCXdY1xENpf_-uw2khORoodKR8
To confirm the operation, we need to use the confirmEmailChange mutation, which accepts the following input:
token: a unique token that was included in the link in the email.
mutation {
  confirmEmailChange(
    token: "eyJ0eXAiOiJKV1QiLCJhbGciOiJIUzI1NiJ9.eyJleHAiOjE1ODYxNzY5OTQsIm9sZF9lbWFpbCI6ImFkbWluQGV4YW1wbGUuY29tIiwibmV3X2VtYWlsIjoibmV3LWFkZHJlc3NAZXhhbXBsZS5jb20iLCJ1c2VyX3BrIjoyMX0.aGAo28Ss_zOn_TwAzLCXdY1xENpf_-uw2khORoodKR8"
  ) {
    accountErrors {
      field
      code
    }
    user {
      email
    }
  }
}
If the token is valid the email should be now updated:
{
  "data": {
    "confirmEmailChange": {
      "accountErrors": [],
      "user": {
        "email": "new-address@example.com"
      }
    }
  }
}
Both mutations require an authorization header with a valid JWT token.
Deleting the account
If you wish to remove your own customer account, you can do so by using two mutations. First, you need to request to delete your account with the accountRequestDeletion mutation. This mutation takes the following input:
redirectUrl: path to a view where the user can confirm deleting the account.
mutation {
  accountRequestDeletion(redirectUrl: "http://localhost:3000/confirm-delete/") {
    accountErrors {
      field
      message
      code
    }
  }
}
As a result, if there are no errors, the user receives an email with a link to confirm deleting their account. The link includes the token query parameter that is required in the second mutation:
http://localhost:3000/confirm-delete/?token=5ff-b5818345d8b64331b068
To confirm deleting the account, use the accountDelete mutation which accepts the following input:
token: a unique token that was included in the link in the email.
mutation {
  accountDelete(token: "5ff-b5818345d8b64331b068") {
    accountErrors {
      field
      message
      code
    }
  }
}
As a result, the account is now deleted.
Both mutations require an authorization header with a valid JWT token.