Using Firebase Authentication
Implementing Firebase Authentication
After activating the Firebase plugin, you can implement logic in your frontend to connect the Firebase REST API with Nautical's createCustomerToken mutation. This mutation:
- Authenticates a user in Nautical with the secure token associated with their Firebase account.
- Returns a JSON Web Token (JWT) that can be used to authorize the user with Nautical's API.
- Creates an active user account in Nautical, or updates it if one already exists.
Token expiration and refresh
By default, the Firebase idToken expires after one hour, while the nauticalToken from createCustomerToken expires after ten minutes.
Ensure that the Firebase token is still valid before using createCustomerToken in Nautical's API. If the token has expired, you'll need to refresh it or sign in again. Note that the refresh token also expires after one hour, ensuring it doesn't exceed the lifespan of the Firebase ID token.
Differentiating user types
Nautical categorizes users into distinct roles in the marketplace:
- Marketplace operators
- Sellers
- Buyers
Firebase Authentication alone does not support the differentiation of user roles or storing additional details, so instead this information must be captured with Firestore.
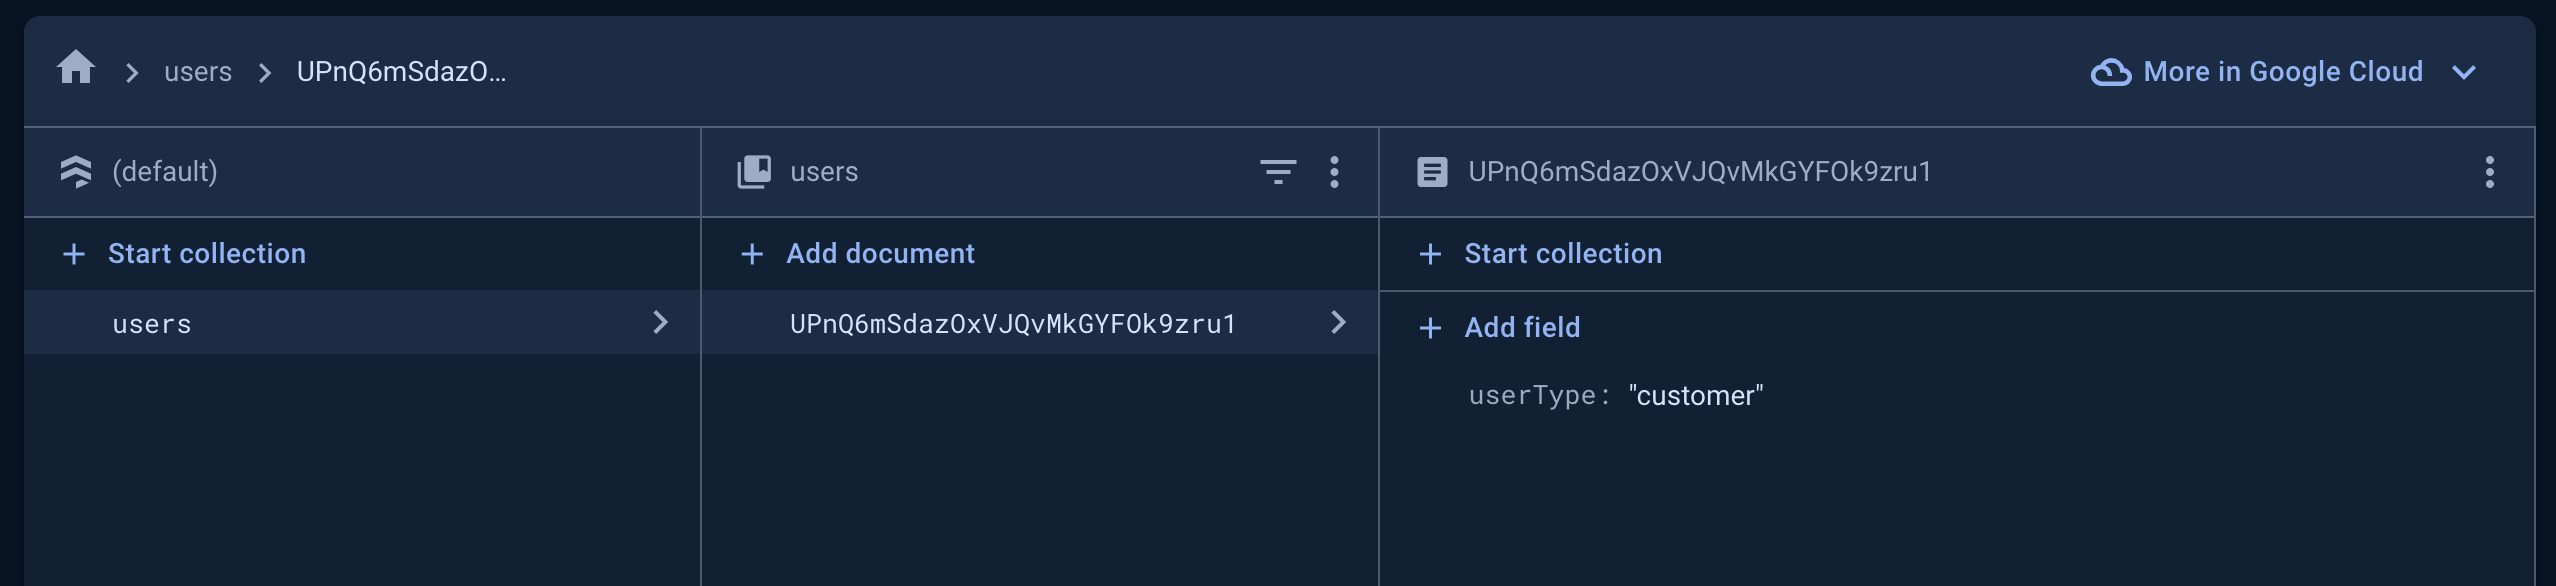
Upon a user's initial registration, Nautical searches within a Firestore users collection. It identifies a user through a documentId that aligns with the Firebase user's UID. By reading the userType field, Nautical determines the user's role and the corresponding access level.
The same service credentials provided when activating the Firebase plugin are used to securely access the Firestore collection and associate the user with the user type.
The userType field in Firestore designates the user's role in Nautical:
| userType | Description |
|---|---|
admin or staff | Users with administrative privileges to manage marketplace operations. |
maker or seller | Sellers who list products or services for sale on your marketplace. Can also be buyers. |
buyer or customer | (Default) Buyers who purchase products on your marketplace. |
Register a new user
For the user registration flow, the account should first be registered in Firebase. The secure token associated with their Firebase account can then be used to fetch an authentication token for Nautical, which in turn creates the user account in Nautical.
See the Seller registration in a Next.JS web app for an example implementation.
Before you start:
The following is required to be able to create seller and marketplace operator users, otherwise all users default to buyers:
- In the Firestore Database, start a collection and set the
CollectionIDtousers. - This collection will be used to capture the
userTypein Firestore along with their user UID, detailed in step 2 below.
Steps
The following steps outline the user registration flow with Firebase and Nautical APIs:
Register user to Firebase
Users are registered to Firebase using the signupNewUser Firebase API endpoint with returnSecureToken set to true.
The idToken will be included in the response for newly registered user.
The user must be registered with an email and password. Anonymous users cannot be used to generate a JWT for Nautical's API.
curl 'https://identitytoolkit.googleapis.com/v1/accounts:signUp?key=[FIREBASE_API_KEY]' -H 'Content-Type: application/json' --data-binary '{"email":"[user@example.com]","password":"[PASSWORD]","returnSecureToken":true}'
Store user type in Firestore
Create a Firestore document in the users collection for each newly registered user.
- Set the
documentIdto the Firebase Authentication user UID. - Add the field
userType, setting the value to the appropriate user type.
The userType must be stored before registering a new user in Nautical. Otherwise all users default to customer users.
See the Firestore documentation on adding data for more information. See a Next.js example below.
Create Nautical token
Use the createCustomerToken Nautical mutation, passing the idToken retrieved from the Firebase response. The user account is created if it does not exist in Nautical.
The response returns a JSON Web Token (JWT) you can use to authorize the user with Nautical's API.
mutation {
createCustomerToken(
  oauthProviderSource: FIREBASE
  oauthProviderToken: "[ID_TOKEN]"
) {
  nauticalToken
  authErrors {
    field
    message
  }
}
}
Authorize the user with Nautical
To authorize the user for operations with Nautical's API, include the user's JWT in the Authorization HTTP header as follows:
{
  "Authorization" : "JWT eyJhbGciOiJIUzI1NiIsInR5cCI6IkpXVCJ9.a123-45678abc_12-lmnopq14rFAKE"
}
Tutorial: Add Firebase Authentication to a Next.js web app
The following code examples show how to set up a Next.js web application integrated with Firebase Authentication and Firestore.
Before you start:
- Install the Firebase Admin Node.js SDK
Add service account credentials JSON
Your service-account.json contains your Firebase project's credentials. Ensure it includes projectId, privateKey, and clientEmail in camelCase.
{
  "clientEmail": "firebase-adminsdk-7ek9g@nautical-testing.iam.gserviceaccount.com",
  "privateKeyId": "1abcdefg23hijkl456mno7890pqrxtuv14942",
  "privateKey": "-----BEGIN PRIVATE KEY-----\MIIEvQIBADANBgkqhkiG9w0BAQEFAASCBKcwggSjAgEAAoIBAQD\n-----END PRIVATE KEY-----\n",
  "clientId": "103289515217672741907",
  "authUri": "https://accounts.google.com/o/oauth2/auth",
  "tokenUri": "https://oauth2.googleapis.com/token",
  "authProviderX509CertUrl": "https://www.googleapis.com/oauth2/v1/certs",
  "clientX509CertUrl": "https://www.googleapis.com/robot/v1/metadata/x509/firebase-adminsdk-7ek9g%40nautical-testing.iam.gserviceaccount.com",
  "universeDomain": "googleapis.com"
}
Initialize Firebase
Initialize Firebase in your Next.js project by creating a Firebase configuration module. You need to import necessary Firebase modules and your service account credentials.
Create the following file in a lib directory, replacing path/to/service-account-credentials.json with the path to your JSON file:
import serviceCredentials from 'path/to/service-account-credentials.json';
import { cert, initializeApp } from 'firebase-admin/app';
import { getFirestore } from 'firebase-admin/firestore';
import { getAuth } from 'firebase-admin/auth';

// Initialize Firebase App with your project's credentials
const firebaseApp = initializeApp({ credential: cert(serviceCredentials) });

// Initialize Firestore and Firebase Authentication
const firestore = getFirestore(firebaseApp);
const firebaseAuth = getAuth(firebaseApp);

// Export for use in other parts of your application
export { firestore, firebaseAuth };
Add environment variables
Ensure you have the following environment variable in your .env file:
NEXT_PUBLIC_FIREBASE_WEB_API_KEY: Your Firebase project's web API key.
Create registration API route
Create an API route in your Next.js application for registering users to Firebase and storing their user type to Firestore.
The following API route handles creating a user in Firebase Authentication and storing their userType as seller (line 26).
import type { NextApiRequest, NextApiResponse } from 'next'
import { firebaseAuth, firestore } from '@/lib/firebase'


const handler = async (req: NextApiRequest, res: NextApiResponse) => {
 const { email, password } = JSON.parse(req.body)


 // creates new user in firebase auth
 const signUpNewUser = await fetch(`https://identitytoolkit.googleapis.com/v1/accounts:signUp?key=${process.env.NEXT_PUBLIC_FIREBASE_WEB_API_KEY}`,
   {
     method: 'POST',
     body: JSON.stringify({ email, password, returnSecureToken: true }),
   }
 )
 const newUser = await signUpNewUser.json()
 // gets id token
 const { idToken } = newUser
 // verifies and gets Firebase user
 const firebaseUser = await firebaseAuth.verifyIdToken(newUser.idToken)


 // creates user (in 'users' collection) in Firestore and uses ID of Firebase user
 await firestore
   .doc(`/users/${firebaseUser.uid}`)
   .set({ userType: 'seller' })


 // ... send idToken and oauthProviderToken to Nautical API via GraphQL


 }
export default handler
You would then send the idToken to Nautical with the createCustomerToken mutation to register the user with Nautical and retrieve the Nautical user JWT.
Log in as an existing user
For the user login flow, the user should first authenticate with Firebase. The secure token associated with their Firebase account can then be used to fetch an authorization token for Nautical.
Steps
The following steps outline the user login flow with the Firebase and Nautical APIs:
Sign in with Firebase
Users log in with Firebase using the signInWithPassword Firebase API endpoint with returnSecureToken set to true.
The idToken will be included in the response, along with the expiresIn value in seconds.
curl 'https://identitytoolkit.googleapis.com/v1/accounts:signInWithPassword?key=[API_KEY]' -H 'Content-Type: application/json' --data-binary '{"email":"[user@example.com]","password":"[PASSWORD]","returnSecureToken":true}'
Create Nautical token
Use the createCustomerToken Nautical mutation, passing the idToken retrieved from the Firebase response.
The response returns a JSON Web Token (JWT) you can use to authorize the user with Nautical's API.
mutation {
createCustomerToken(
  oauthProviderSource: FIREBASE
  oauthProviderToken: "[ID_TOKEN]"
) {
  nauticalToken
  authErrors {
    field
    message
  }
}
}
Authorize the user with Nautical
To authorize the user for operations with Nautical's API, include the user's JWT in the Authorization HTTP header as follows:
{
  "Authorization" : "JWT eyJhbGciOiJIUzI1NiIsInR5cCI6IkpXVCJ9.a123-45678abc_12-lmnopq14rFAKE"
}
Query Firebase user UID
The Nautical user.externalId field stores the Firebase user UID for accounts that originated from Firebase Authentication.
For example, the following query returns a single user's Firebase UID:
query {
  user(id: "VXNlcjoyNzQ=") {
    externalId
  }
}
{
  "data": {
    "user": {
      "externalId": "p836blG1RHWnZ94dGAfHOFl2kZw2"
    }
  }
}