Connect Stripe for payments and payouts
Learn how to connect and activate Stripe in your marketplace. Stripe can be used to collect payments from buyers and pay out funds to the sellers on your platform.
If you use Stripe to process incoming payments from buyers, but do not pay out your sellers with Stripe Connect, you may be in violation of Stripe's Terms of Service.
Set up Stripe account
Before you can connect Nautical to Stripe, you must register for a Stripe account. Make sure to confirm your email address and activate your account.
To enable payouts, you'll need to set up Stripe Connect. As part of the setup, you'll need to customize your seller onboarding signup form including adding a logo and your brand colors.
Gather Stripe API keys
You'll need your secret and publishable API keys to activate the Stripe integration with Nautical. You can obtain your API keys from Stripe's documentation when logged in, or from your Developer Dashboard.
Activate Stripe integration
To ensure webhooks function properly, make sure the API URL is set to your GraphQL endpoint in your marketplace configuration settings. Contact your Nautical representative about updating this value.
-
Go to Settings -> Apps -> Stripe.
-
Set the following fields:
Field Description Store customer cards If enabled, Stripe will store the payment method used by the buyer and associate it with the Customer resource created during the checkout process. See Stripe's documentation to learn more. Automatic payment capture If enabled, funds will be captured immediately and automatically upon checkout. If disabled, the funds are authorized but the charge needs to be manually captured. Learn more about this setting. Enable payouts If enabled, the marketplace operator can perform seller payouts through Stripe Connect directly from Nautical. Sellers can connect a Stripe account to this account to facilitate payouts. Supported currencies Your currency in the ISO 4127 3-letter code format. If you support more than one currency, separate each one by a comma. For example: USD, CAD, EUR, GBP.Account type Choose between the standard or express Stripe account type.
This selection determines the type of Stripe Connect accounts created for newly onboarded sellers. See Stripe's documentation to learn about the differences between account types.API version The Stripe API version to use. Defaults to the latest supported version. noteThe Webhook endpoint field is read-only and automatically populated after activating Stripe.
-
Select Save.
-
Under Authorization, set the following API keys. To obtain your keys, see Stripe's documentation:
- Public API key: Your Stripe publishable API key.
Test public keys start withpk_testwhile production public keys start withpk_live. - Secret API key: Your Stripe secret API key.
Test secret keys start withsk_test, while production secret keys start withsk_live.
noteThe Webhook secret key field is read-only and automatically populated after activating Stripe. If the webhook endpoint and secret key do not populate automatically, ensure the API URL is set to your GraphQL endpoint in your marketplace configuration settings. Contact your Nautical representative about updating this value.
- Public API key: Your Stripe publishable API key.
-
Select Activate.
Using Stripe Connect payouts
To enable payouts, you must first activate the Stripe integration with the appropriate settings. Then, you must onboard sellers to receive payments from you.
App setup requirements
First, ensure you've activated the Stripe app in the App Marketplace with the following settings configured appropriately:
- Enable payouts must be turned on
- Account type should be set to the Stripe account type you want to onboard sellers with, which can be either
expressorstandard
Ensure your Stripe account has all the information it needs to be fully active to avoid any issues with processing payouts from Nautical.
Onboard sellers with Stripe Connect
Each seller must enroll for their own Stripe Connect account to receive payments. Once Stripe is activated to support payouts, your sellers can retrieve a Stripe Connect onboarding link to connect or create their Stripe account from their Seller Details page.
In the marketplace operator's Stripe Dashboard, you can view all connected accounts and their status from the Connect tab:

If you've activated Stripe with payouts enabled and are encountering an error while retrieving onboarding links, ensure that you have completed the necessary setup steps in Stripe. These steps include completing your platform profile and customizing your brand settings.
An error will also occur if the seller's address is invalid.
Steps
- Marketplace Operators
- Sellers
- Navigate to Sellers -> Accounts, and open the seller you want to onboard.
- Open the Settings tab.
- Under Payout Account, select Get onboarding link. Once the system processes the request and receives the required information from Stripe, the page refreshes with the Onboarding Link and Account ID:
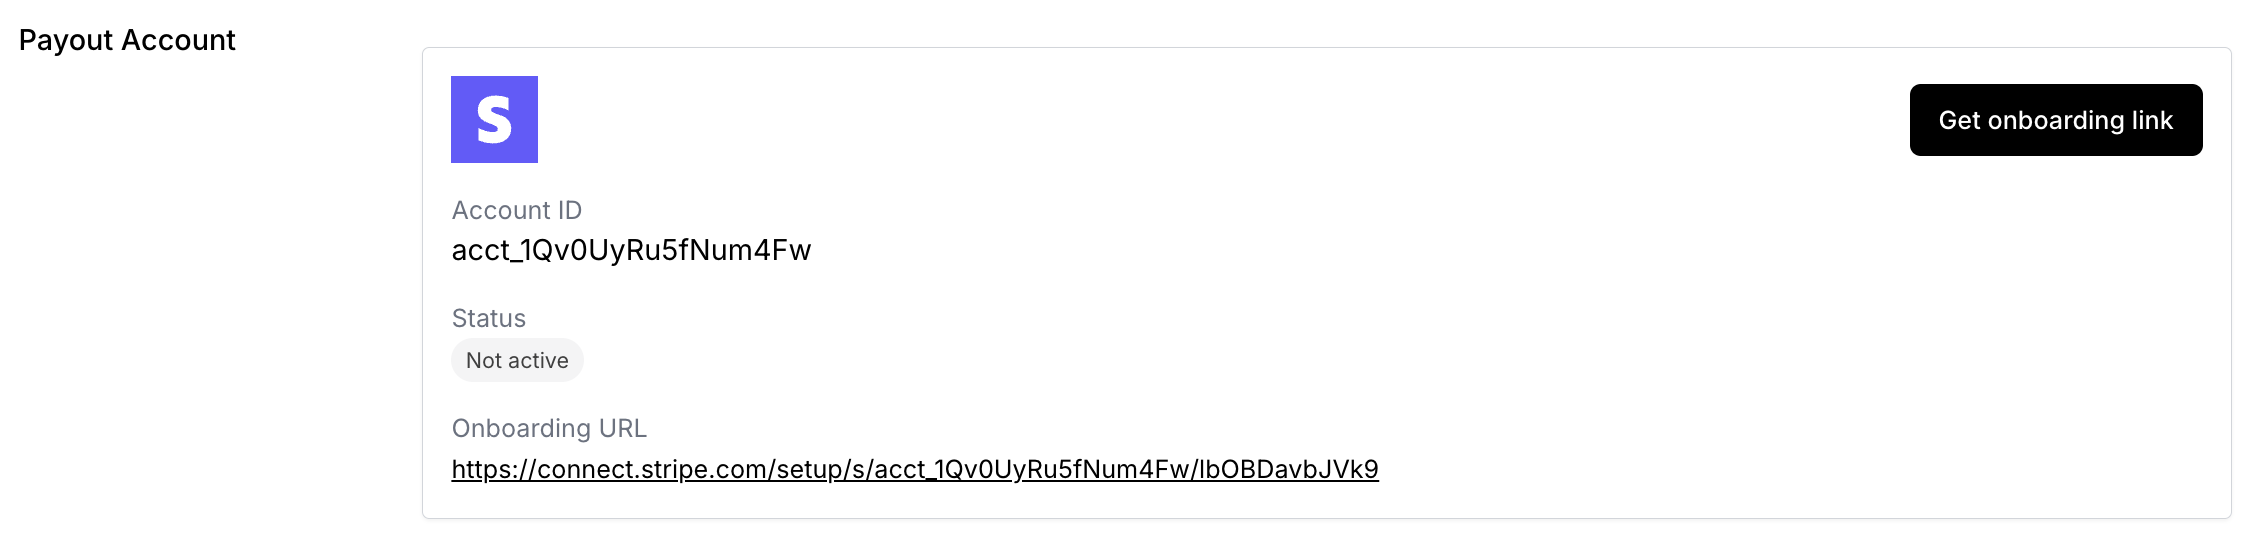
Get onboarding link from Nautical - Sellers can go to the Onboarding Link to complete their onboarding through Stripe Connect.
The information required during the onboarding process depends on whether you're using the Stripe Connect Standard or Express account type.
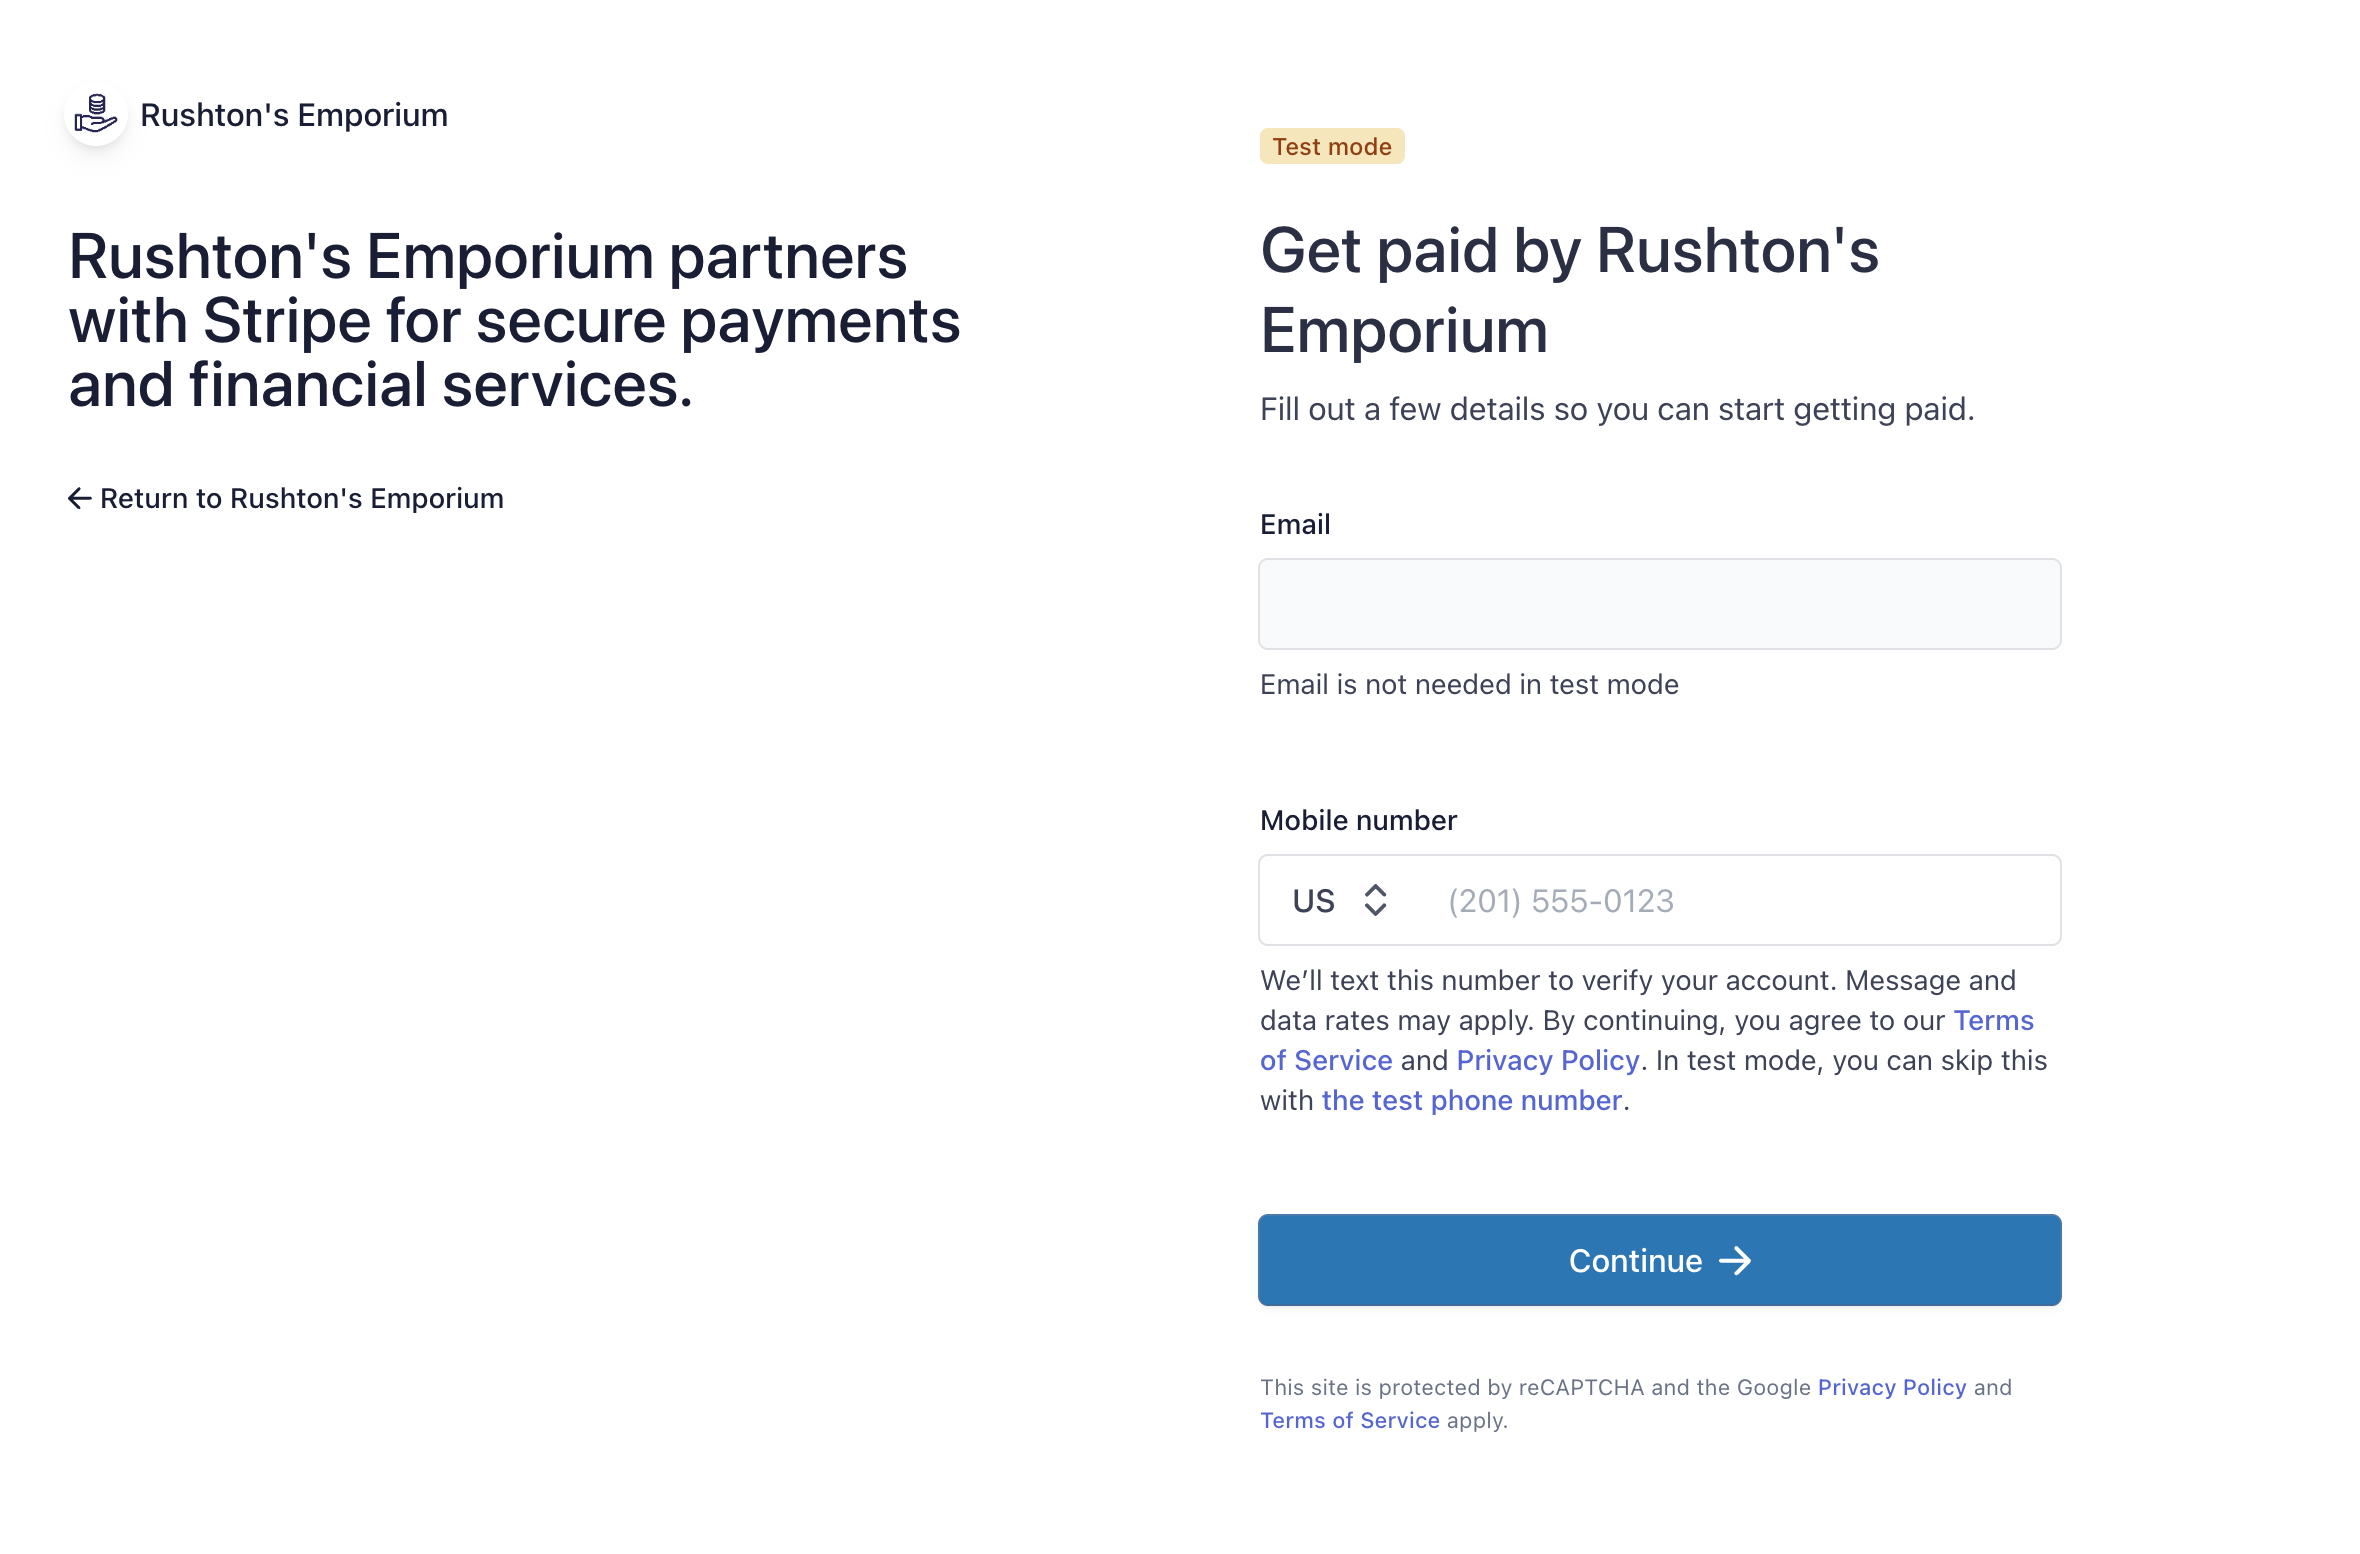
Stripe Connect onboarding links expire after seven days. If a seller abandons the sign up flow and their link is no longer working, they can select Get Onboarding Link again to pick up where they left off.
- Once the seller completes their sign up through Stripe, the Payouts section on their Seller Details page is updated to show their Account Status and Payout Schedule configured in Stripe.
- In the dashboard, navigate to Settings -> Business Details.
- Under the How the marketplace pays you section, select Get onboarding link. Once the system processes the request and receives the required information from Stripe, the page refreshes with the Onboarding Link and Account ID:
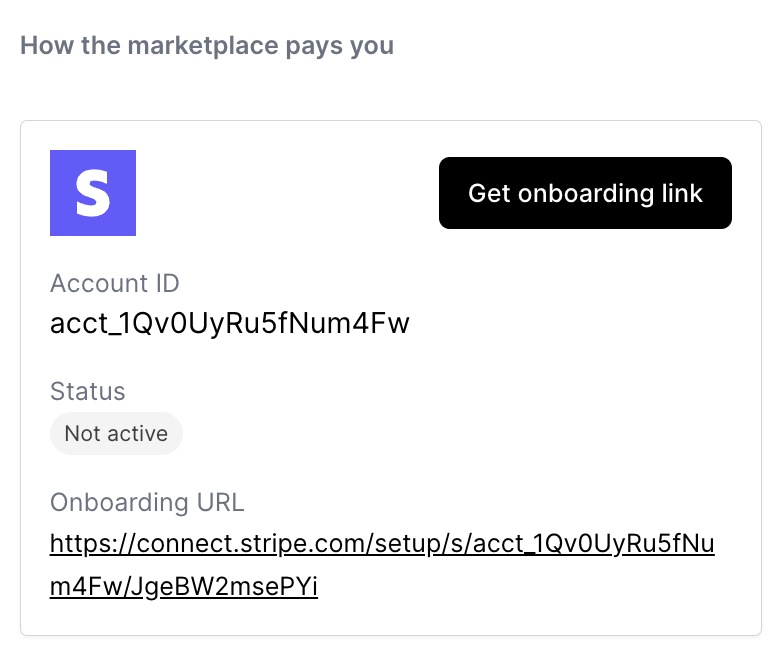
- Sellers can go to the Onboarding Link to complete their onboarding through Stripe Connect.
The information required during the onboarding process depends on whether you're using the Stripe Connect Standard or Express account type.
Stripe Connect onboarding links expire after seven days. If a seller abandons the sign up flow and their link is no longer working, they can select Get Onboarding Link again to pick up where they left off.
- Once the seller completes their sign up through Stripe, the Payouts section on their Seller Details page is updated to show their Account Status and Payout Schedule configured in Stripe.
Result
Once a seller's Stripe Account Status shows "Payouts Enabled" on their Seller Details page, you can start processing payouts to that seller.
Processing payouts
Once orders are eligible for payout, you can start processing payouts to your sellers onboarded with Stripe Connect.
When processing payouts, set the Payment Gateway to Stripe to route funds using Stripe Connect. You must have sufficient balance available in your Stripe account for the payout to succeed.
Once the payout is processed from Nautical, the Payout Disbursements section of a seller payout statement shows the funds processed using Stripe Connect.
Shortly after, the funds will be reflected as a Payment in the seller's Stripe Connect account:
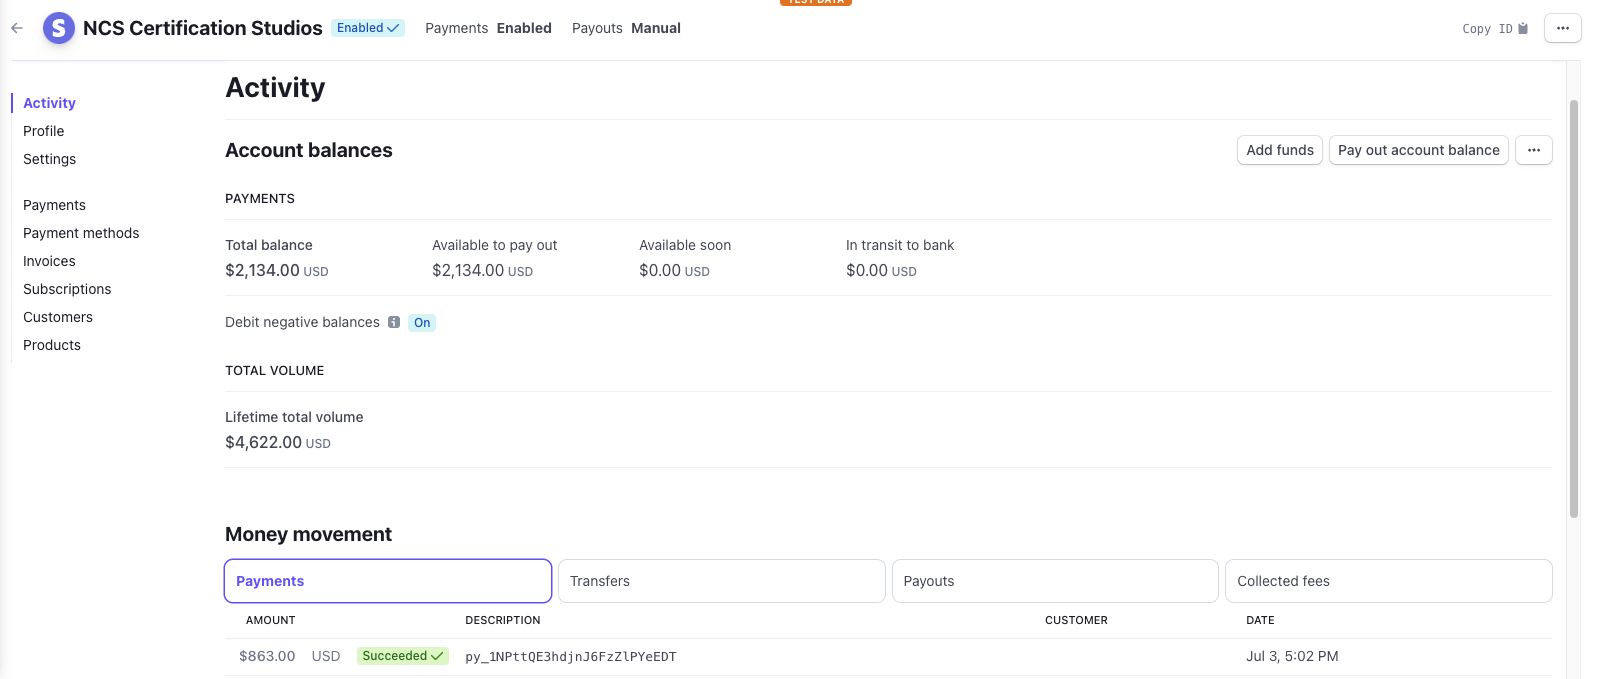
There may be a difference in the date and time shown in Nautical and Stripe due to a timezone difference. The Stripe payment should appear within minutes of processing the payout from Nautical.
These payments will accumulate in the connected account's Stripe balance until they are paid out according to their payout schedule. You can see the balance from the Available to pay out field.
By default, the payout schedule is set to a daily rolling basis. You can adjust the payout schedule as needed from the Stripe Connect settings or switch to manual mode to manually control when the balance is paid out.