Connect Typeform for onboarding
Nautical integrates with Typeform for onboarding sellers or customers through a sign-up form.
Before you start
- You must have an active Typeform account. Create one if you don't have one already.
- Create the Typeform workspace that you want to connect to Nautical.
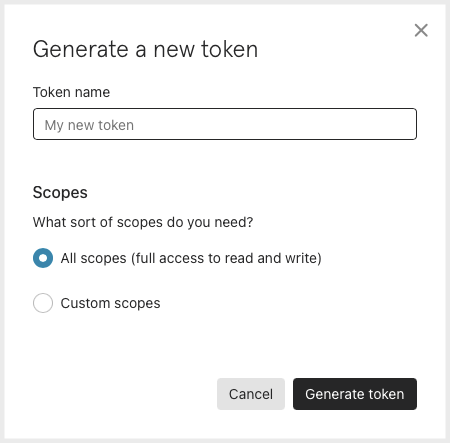
- You must generate a personal token to grant Nautical access to Typeform. Save this token as you'll need to enter it while activating the Typeform integration. For instructions, see the Typeform documentation.
note
When generating the token set Scopes to All scopes
Activate the Typeform app in Nautical
- In the dashboard, go to Settings -> Apps.
- Open Typeform
- Under Authorization, enter the personal token you generated from Typeform.
- Select Activate to enable the integration.
Set up form data mappings
After activating the Typeform integration, you must set up data mappings to ensure that the system can correctly map the fields received from your forms.
Create a mapping for each Typeform form you want to receive data from. You can set up data mappings to create sellers or customers, determined by the process you select in the data mapping.
Steps
- Go to Settings -> Apps -> Typeform.
- Under Data Mappings, select Add new mapping.
The Add Flow Mapping dialog appears. - Select the Process you want to map incoming data for:
CUSTOMER_CREATION: Map the incoming data to create customer accounts.SELLER_CREATION: Map the incoming data to create seller accounts.
- In the Form field, select the name of the form you are creating the mapping for.
- In the fields that appear, select where to map each field received from Typeform.
note
Required fields are marked with an asterisk.
- Select Save.
Configure webhooks
You must configure Typeform to send webhook payloads to Nautical, and then start the Nautical webhook listener to process the incoming webhooks.
Configure webhooks in Typeform
- Sign in to your Typeform account.
- Open an existing Typeform workspace.
note
Ensure the project is Published.
- From the navigation bar in your project workspace, select Connect.
- Open the Webhooks tab.
- Select Add a webhook.
- In the Endpoint field, enter your marketplace webhook endpoint, and then select Save.
note
The endpoint to receive webhooks is in the following format:
https://api-<domain_name>.com/webhooks/ - To activate the webhook, select Webhook ON.
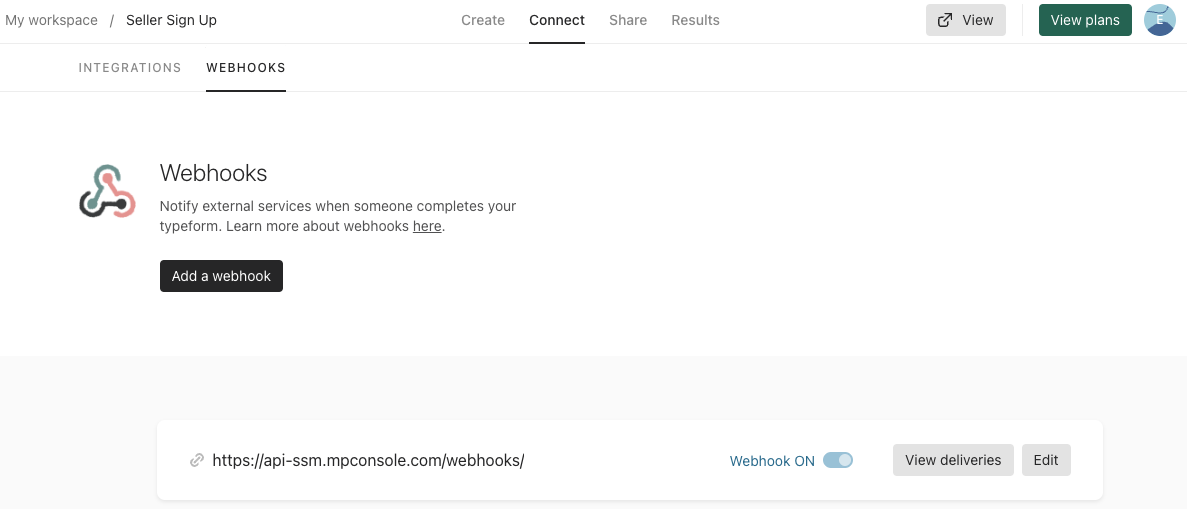
- Select View deliveries to see the webhook traffic.
- Select Send test request to verify the payload is being received by Nautical

Start the Nautical webhook listener
You must enable the webhook listener for Nautical to process incoming webhooks.
- From your Nautical dashboard, go to Settings -> Webhooks.
- On the Webhook Jobs page, select Enable Schedule.
You only need to enable the schedule once for each app that send webhooks.